I forgot to add to my post yesterday (and I don't know how) that after feeling rubbish for a few days I won a flash giveaway on My Mums Craft Shop on facebook for 50 cabochons - they look so scrummy.
I was very excited!
Click here to go the different ones Kitty has in her shop. I shall profile one or two when I receive them!
Still no crafting but I'm just going to try and catch up on a few blogs to see what everyone has been up to.
Jill
(ps. I'm not at death's door just a potential lurgy that has given me low blood pressure which equals the world being a tad fuzzy!!).

28 April 2013
27 April 2013
Say cheese!

Just before I gave up I managed to do this quick commission for a friend.
They have a relative who is somewhat of a 'paparzzi' and has had a big op this week.
I found this great pic on my DOCrafts Digital Designer Boofle CD. I have cut the top of the camera out twice and slightly 3D'd it (so it still goes through the standard post). Some teeny gems in the corner and card candi either side of a computer generated sentiment.
All mounted on lovely kraft card.
24 April 2013
A baby boy

My friend Mary was thrilled to give birth to a little boy recently called Alfie.
This card is a tried & tested format but this time I've used a pearl white base card and decorated with white and blue tags, some parchment tags, punches, stamps and embellishments.
Tag tops are finished with either a little gem or ribbon from the stash. His name has been added with teeny peel off letters.
I was also very chuffed with an additional present that I commissioned from Sarah of www.charactercreations.co.uk .

21 April 2013
Tulips
Wasn't yesterday lovely?
I had planned to add a picture from my outing yesterday but took a different camera and now need to find the lead for it!
Anyway, myself and Mum had booked a coach trip to take us to the Cotswolds to visit Adam's Farm (him from Countryfile) - what a great day to be out and about, we were very lucky.
Definitely worth a visit. Lots for children to do, many rare breeds to look at, baby animals and currently lambing which was very interesting - we even saw the man himself!
We also went on a 2 mile trail round the site, across fields and the scenery was stunning.
Back to crafting today and this card I have made for Jo Dumbleton's Facebook Friday challenge.
Another 'cased' idea, I had never seen these before until I did a spot of research yesterday. The subject of this weeks challenge was to use the Stampin' Up owl punch.
I have used 3 owls per each tulip head - what a brilliant idea and so effective. I've sponged round the edges of each petal, cut some leaves and mounted it all on an embossing folder piece.

18 April 2013
Workshop Project 2
The second project that I have finally completed from my Molly Blooms workshop is this one:

This is the project that made me think of the Crafty Bunch - my local group of crafty ladies that meet once a month - I thought this was something different that they might like, although I am obviously opening myself up for sorting that out by suggesting it!
I'm not sure what we should call it, it's a kind of card/gift bag all in one.
The main event is made from one sheet of double sided 12x12 paper - just folded, no sticking.
The next picture shows it from the side, it has a pocket on each side.

For this example we punched a scallop circle & standard circle for the top to place over the opening. Some more hessian ribbon, a tag and button were also added.
The little 'seed packet' in the side was also simple to make with a few folds although some sticking was involved in that!
More distressing, punching, ribbons, gems, buttons and sticking followed like the windmill card.
And then we got to colour in another of the new range of Molly Blooms stamps which I have then cut out and mounted on all the layers.
I think it is a lovely idea and something a bit different again - I look forward to your feedback!
Jill

17 April 2013
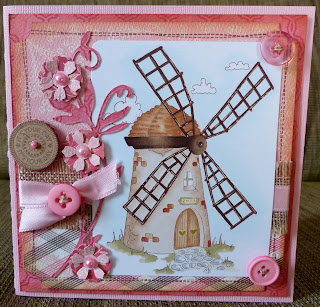
Molly Blooms Workshop
I was lucky enough to secure a spot on a Molly Blooms workshop with the creator & designer of the stamps Clare Rowlands on Saturday at Jobo Crafts in Weston Super Mare.
She uses copic pens to colour all her images and has quite a distinctive style to her cards. We got to make 3 projects, this is the first one.
The windmill is from her new range of stamps. You will see there is a lot of distressing, layering, punching, adding of ribbon & buttons - and that is before we even coloured anything.
I would never of got the same colour effect without some of the tips she gave us and I am really pleased with the finished article.
The pictures below are the outside and inside of the card. The inside has another of Clare's new stamps which I have coloured and then cut out.


15 April 2013
Butterflies & Flowers

Again, these were shown to us at last years shared ideas day at the Quilling Guild AGM and this month are featured in our fabulous Guild magazine.
I forgot that when I started making ring coils for these projects Val from Aquarius wondered what I was up to and I said it would make some sense eventually - as she mentioned yesterday she gets what I was up to now!
This butterfly is made with 4 full ring coils which were wrapped around my glue pot (with a separate supply of glue to hand I might add!).

Body is a marquise shape with antennae stuck to it.
The flower uses the same sized coils and is once again filled with a selection of shapes and a fringed flower is added to the centre.
These were also quite popular at the weekend and certainly something different.
14 April 2013
Sheep!

Diane Boden from JJ Quilling makes some adorable eyes on animal cards and I don't have the knack and didn't have time to master them this week.
I'm afraid I resorted to google eyes which look a rather weird colour in this picture.
This little chap was shown to us by Diane at last years shared ideas day, then shared on our exclusive blog before being published in the latest Quilling Guild magazine.
He is made from ring coils (strip of paper wound round a pen/tool or dowel) which are cut in half before being stuck to tissue paper.
Paper has been crinkled before being rolled in to a coil for his face and ears and some loose coils for his hair-do!
We had several successful sheep at our guild gathering in Somerset today and I will rustle up some more pictures for tomorrow of other items I made.
I may also have come across a potential Crafty Bunch project on my adventures this weekend - so watch this space this week if you are an interested party!!
Jill
13 April 2013
Workshop Weekend
A quick post between workshops today.
Had a great workshop today which I shall blog about in the next day or two (a bit of finishing off to do first & daylight needed for pics).
Now just finishing prep for tomorrow's quilling gathering - got to master sheep eyes and then I can provide pics of these as well!
Jill
Had a great workshop today which I shall blog about in the next day or two (a bit of finishing off to do first & daylight needed for pics).
Now just finishing prep for tomorrow's quilling gathering - got to master sheep eyes and then I can provide pics of these as well!
Jill
11 April 2013
Spring flowers

They are cards I have made before - I think the original idea came from a workshop.
The flowers are just simple marquise (eye) shapes with some loops for the centre.
The right hand leaves are made on an onion holder to give them the loops and the third leaf is just a shaped coil.
They are simple but effective and show how just using a different colour gives a different look to card.
9 April 2013
Girls night out

This was a bit of a last minute request and using this Stamping Bella image again seemed to be quite suitable.
I've paper pieced both dresses this time and coloured the rest of the image with copics - adding copic spica to the shoes and dress frills for added sparkle.
Layered the image and mounted on an A5 card made using the lovely Anna Marie kraft card.
Computer generated sentiment to match the dresses and finished with a splash of card candi!
Just found out Crafty Bunch is cancelled tomorrow which is a shame (no heating in the hall so the right choice nevertheless) so will have to crack on with extra crafting at home.
8 April 2013
Going to seed

The background paper is from the stash and I have used a script stamp on the right hand side of it but rather more subtly than I had envisaged.
The main image is a woodware stamp called going to seed which I have heat embossed and added a couple of gems to.
I have also added some little bird stamps to the paper and 'dashed' round the edge. Card candi coloured in copics to tie in with ribbon and SU sentiment stamped and punched out with some daubing to tone it in.
After seeing Jose at the weekend she commented that sometimes it is hard to know what size the cards are posted on blogs - you have an image in your head of their size and they can look completely different in the flesh - this card is 6x6" today.
7 April 2013
Girls just wanna have fun

I saw some lovely cards using this stamp made by Karen Watson for Stamps & Memories and not only loved it but know I can get some use out of it.
It is a Stamping Bella image called 'Victoria & Juliette's night out'.
I don't usually like images that don't include an facial expression but didn't even notice until I coloured the girls faces in. I've coloured the skin, hair and drinks with copics. The dresses are paper pieced with added glitter and stickles. I've daubed round the edge, added matching gems and mounted on a piece from a lovely paper pad which I can find the name of when I've unburied my desk from the weekend!
Ribbon from the stash and the sentiment stamped from the same set.
Had to have a nap after I got home from today's bike race before cracking on with the next set of quilling samples.
6 April 2013
Spreading the word!

Thanks to Jose from Jose's Jottings for popping by this morning after reading yesterday's post.
The sun was out first thing this morning although it was frosty so we were all much chirpier to start the day! A bit cold when we first started but we were so busy the morning flew by.

More fuchsias today but mainly lots of basic shapes showing people how easy and fun it is to quill.
Next project is to complete some samples for next weeks event which I did start today and they are already proving to be a bit epic!
To finish, a sneaky pic of Val from Aquarius Blog (sorry!) who was very busy making lovely fabric flowers & shapes from yo-yo templates - and very popular they were proving too.
5 April 2013
Fuchsia Anniversary 2!

I have made a few samples as I have been demo-ing quilling today and will be back tomorrow.
I made a fuchsia from Judy Cardinal's Quilled Borders & Motifs book which has been very popular. As my first request of the day was for an anniversary card (which I didn't have) I quilled some more and made them in to this card.
I had many admirers of Jane Jenkins lovely three dimensional creatures today - especially the frog which always wins in the popularity vote and many people still wondering why I had some chocolates stuck to cards - at least they are realistic.
I did have some in an actual chocolate box and a work colleague took some convincing that they were really made of paper - so well done to Diane Boden for coming up with such a crazy idea!
Hoping for a few degrees more in temperature tomorrow as today wasn't the best for sitting in a draughty marquee!
3 April 2013
Fuchsia Anniversary

This card was for a colleague who is celebrating their 30th Wedding Anniversary this week.
After going through a few designs and some stamps (so new I hadn't made a card with them) it turned out his wife's favourite flowers are fuchsias, so this stamp it had to be!
This was a new Woodware purchase.
I've stamped it on plain card and re-stamped for the actual petals which I've coloured in copics, cut out and added to the base. The sepals and buds I have paper pieced.
The leaves are a combination of colouring the original image and colouring separate leaves which I have 3D'd on top. Some of the stamens have a touch of stickles too.
I've daubed round the edge of this piece and double mounted, the bottom layer using a fiskars punch - which I only found whilst trying to find an SU one I had mislaid!
Computer generated sentiment layered on card and ribbon.
The card itself is Anna Marie pearl card and I've used 4 large pearls on the corner of the main image and little ones in the punched border to bring in the fact that it is a pearl anniversary.
2 April 2013
1D!

This was a request for my boss for his daughters birthday today.
She loves One Direction so after finding a suitable picture I subjected it to the DOCrafts Digital Designer and made a pyramage of them.
I layered this on a piece of card mounted on a CD.
Computer generated sentiment with band logo and some little punched musical notes to finish.
This pyramage is very effective I also did a retirement card last week using pictures of the 'subject' which has turned it into a very popular card requirement!
1 April 2013
New Baby
In what will be the first of several baby cards in the next few weeks, here is the first one:

I've used the Woodware stamp, slightly unfortunately named 'Huge Baby'!!
I've stamped it on white and paper pieced the letters with various pink related papers.
The inspiration for this card came from a card Francoise Read (the stamps designer) made and I saw at the Exmouth workshop I went to recently. Hers had a few more additions than this but the basic design is very much 'cased'.
The 3 little sentiments are separate stamps within the same set which I think is really good value.
Finished with some card candy, a ribbon bow and a couple of layers that I've added to an A5 card blank.
Subscribe to:
Posts (Atom)